Introduction
Computer musicians with experience in MIDI-based studio setups may find themselves lost when they first come to Csound. For some, Csound has the promise of doing nearly anything one would want to do with sound, but when they dive into working with the tool they quickly get frustrated trying to get past the initial learning curve. The new user may not understand how to use Csound in ways that are familiar to them from their experiences in working with tools found in MIDI-based studios: synthesizers, effects, mixers, and parameter automations.
For this article, we will analyze and discuss a basic MIDI-based studio setup composed of instruments, effects, mixers, and automations. We will then discuss how to design a Csound project to achieve each of those features. An example Csound CSD project file will be used to demonstrate a working implemention of the design. The reader is expected to have familiarity with MIDI-based studio environments and basic understanding of Csound.
Analysis of MIDI-based Studio Environments
Instruments and Mixer
The following diagrams show the modules and signal flow in a basic MIDI-based studio environment. The first diagram:

Figure 1. Basic MIDI-studio Setup
is an overview picture of a studio. The diagram shows three instruments connected to a mixer that in turn mixes down to a stereo signal and outputs the final signal to an audio output (i.e. wave file, speakers).
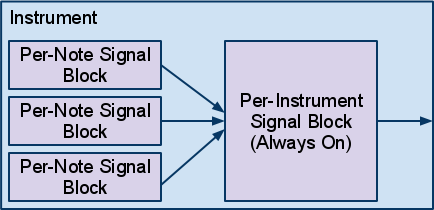
Figure 2. Internal View of an Instrument
Figure 2 shows that within a single instrument, instruments may be further broken down into audio modules. In electronic and computer music, instruments are generally created with two types of signal blocks: one block that generates sound on a per-note basis, and one block that processes signals on a per instrument basis that is always-on. The per-note signal block that generates sound may also include filters and other sound modifying modules while the per-instrument signal block is generally composed of sound processing modules such as filters, reverb, and chorus. A MIDI instrument will take the audio signals generated by the individual per-note signal blocks, sum them, and either directly output the summed signal or further process the signal in an always-on per-instrument signal block.
It is worth noting that MIDI-based instruments usually output either a mono or stereo signal. If the instrument outputs a mono signal, the single signal is often routed to a single input channel on a mixer and panning is controlled by the mixer, converting the mono signal into a stereo signal. If the instrument outputs a stereo signal, the signal is often routed to two input channels on a mixer and panning on the left signal is panned hard left and the and right signal is panned hard right to preserve the stereo image output by the instrument.
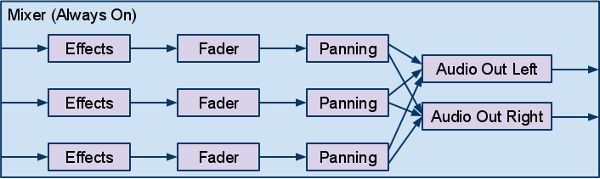
Figure 3. Internal View of a Mixer
Within a mixer, the incoming signals from instruments are routed internally through individual channels. Each channel may pass the signal through different effects processing modules, apply panning, and adjust the signal level with a fader. In Figure 3, a simple mixer is shown where three incoming audio signals are processed, mixed down to a stereo signal and finally output. In more complicated mixer setups, the signals from channels may be mixed down to subchannels which can further process the signal before routing to the master output channel.
Effects
Effects are signal processing units which take in audio signals, process them, and output the processed signal. Common effects include reverb, echo/delays, chorus, compression, and EQ. Like mixers and the always-on signal block of instruments, effects are always-on. They will be continously processing even if there is no signal coming into the effects unit.
Effects may also be built to work with mono or stereo signals, where the number of channels in and out may or may not match. The design of an effect may influence how the effect is placed in the signal flow chain, i.e. whether to put the effect before or after the panning module.
Parameters and Automation
Instruments, mixers, and effects all have parameters that are configurable by users. Users will work with knobs, faders or other controls to manipulate these parameters. User may also use a sequencer to automate the values of these parameters over time. Examples of parameters include filter cutoff frequency, delay time, and feedback amount.
Analysis
From the observations above, the following features are identified as requirements that we will need to be able to implement in our Csound project:
- Instruments
-
- Per-Note Signal Block - generates audio on a per-note basis and is bound in time by the length of the note
- Per-Instrument Signal Block - processes audio on a per-instrument basis and is always-on
- Mixer
-
- Fader - will scale the signal to make it louder or quieter
- Panning - will take a mono signal and output a stereo signal; the panning control will control where in the stereo field the signal will be
- Effects - processes an audio signal; these are always-on and may be mono or stereo
- Parameter Automation - allow controlling setting the values of a parameter over time
Now that we have looked at a basic studio setup and analyzed features we want to implement, we will now move on to implementing these features using Csound.
Implementation in Csound
In this section, we will look at implementing each of the four primary concepts mentioned in the previous section: instruments, a mixer, effects, and parameter automation.
The following example CSD shows the complete design implemented in Csound:
; EMULATING MIDI-BASED STUDIOS - EXAMPLE
; by Steven Yi
;
; Written for issue 13 of the Csound Journal
; http://www.csounds.com/csoundJournal/issue13
;
<CsoundSynthesizer>
<CsInstruments>
sr=44100
ksmps=1
nchnls=2
0dbfs=1


/* SIGNAL ROUTING */

connect "Saw", "out", "SawBody", "in"
connect "SawBody", "out", "Mixer", "in1"
connect "Square", "out", "Mixer", "in2"

/* ENABLE ALWAYS ON INSTRUMENTS */

alwayson "SawBody"
alwayson "Mixer"

/* USER DEFINED OPCODES - These are used as Effects within the Mixer*/

opcode FeedbackDelay, a,aii
setksmps 1

ain, idelaytime, ifeedback xin
afeedback init 0

asig = ain + afeedback

afeedback delay asig * ifeedback, idelaytime

xout ain + afeedback

endop


/* INSTRUMENT DEFINITIONS */

instr 1 ; Automation - set value

Sparam = p4 ; name of parameter to control
ival = p5   ; value
kcounter = 0

if (kcounter == 0) then
chnset k(ival), Sparam
turnoff
endif

endin

instr 2 ; Automation instrument

Sparam = p4 ; name of parameter to control
istart = p5 ; start value
iend = p6   ; end value

ksig line istart, p3, iend

chnset ksig, Sparam

endin

/* The per-note signal block of the Saw instrument */
instr Saw

ipch = cpspch(p4)
iamp = p5

kenv linsegr 0, .05, 1, 0.05, .9, .1, 0
kenv = kenv * iamp
aout vco2 kenv, ipch

outleta "out", aout

endin

/* The always-on signal block of the Saw instrument */
instr SawBody

aout inleta "in"

kcutoff chnget "sawBodyCutoff"

aout moogladder aout, kcutoff, .07

outleta "out", aout

endin


/* The per-note signal block of the Square instrument */
instr Square

ipch = cpspch(p4)
iamp = p5

kenv linsegr 0, .05, 1, 0.05, .9, .1, 0
kfiltenv linsegr 0, .05, 1, 0.05, .5, .1, 0

aout vco2 1, ipch, 10
aout lpf18 aout, ipch * 2 + (ipch * 8 * kfiltenv), 0.99, .8

aout = aout * kenv * iamp

outleta "out", aout

endin


/* Mixer for the project */
instr Mixer

ain1 inleta "in1"
ain2 inleta "in2"

/* reading in values for automatable parameters */
kfader1 chnget "fader1"
kfader2 chnget "fader2"

kpan1 chnget "pan1"
kpan2 chnget "pan2"

; Applying feedback delay, fader, and  panning for the Saw instrument
ain1 FeedbackDelay ain1, .5, .4
ain1 = ain1 * kfader1
aLeft1, aRight1 pan2 ain1, kpan1

; Applying fader and panning for the Square instrument
ain2 = ain2 * kfader2
aLeft2, aRight2 pan2 ain2, kpan2

; Mixing signals from instruments together to "Master Channel"
aLeft sum aLeft1, aLeft2
aRight sum aRight1, aRight2


; Global Reverb for all Instruments
ilevel  = 0.7
ifco    = 3000
aLeft, aRight   reverbsc    aLeft, aRight, ilevel, ifco

; Output final audio signal
outs aLeft, aRight

endin

</CsInstruments>

<CsScore>

i "Saw" 0 .25 8.00 .5
i. + . 8.02 .
i. + . 8.03 .
i. + . 8.05 .

i "Saw" 4 .25 8.00 .5
i. + . 8.02 .
i. + . 8.03 .
i. + . 8.05 .

i "Square" 0 .25 6.00 .5
i. 1 . 6.00 .5
i. 2 . 6.00 .5
i. 3 . 6.07 .5
i. + . 6.07 .5

i "Square" 4 .25 6.00 .5
i. 5 . 6.00 .5
i. 6 . 6.00 .5
i. 7 . 5.07 .5
i. + . 5.07 .5

; Initializing values for automatable parameters
i1 0 .1 "fader1" 1
i1 0 .1 "pan1" 0
i1 0 .1 "fader2" 1
i1 0 .1 "pan2" .75
i1 0 .1 "sawBodyCutoff" 1000

; Setting values for automatable parameters
i2 0 1 "sawBodyCutoff" 1000 8000
i2 4 1 "sawBodyCutoff" . .

i2 4 4 "fader1" 1 .5
i2 4 1 "pan1" 0 1
i2 0 4 "fader2" .4 1
i2 4 4 "fader2" 1 .4


; extend score so effects have time to fully process
f0 10

</CsScore>
</CsoundSynthesizer>
For a Csound orchestra, users have two primary abstractions available to them to use: Instruments and User-Defined Opcodes (UDO's). The coding of instruments and UDO's are primarily the same though their usage is different: instruments can be initiated by the Csound score as well as from the orchestra (by using the event opcode), while UDO's are only callable within the orchestra by instrument or other UDO code. We will be using both instruments and UDO's to achieve emulating a MIDI-based studio setup.
NOTE: To differentiate between the abstract concept of an Instrument that we are trying to achieve and a Csound instrument, the text from this point out will refer to Csound instruments (lower-case 'i') for Csound and Instruments (capital 'I') for the abstract conceptual instrument.
Implementing Instruments
To implement an Instrument, we will create two basic Csound instruments that will handle the per-note and per-instrument audio signal blocks of an Instrument. The Csound instrument Saw represents the per-instrument audio signal code of the Instrument. Instances of this instrument will be created by the notes written in our score. The Csound instrument SawBody represents the always-on part of our Instrument. Since we would like to have this be always running, we use the the alwayson opcode in the instr 0 space of our Csound orchestra to keep the SawBody instrument always running for the duration of our project. (Note: The alwayson opcode will only turn an instrument on for as long as the total duration of the normal notes within a score. To extend the always-on instruments processing time to be longer than the score notes, which allows for extra time for Effects like delays and reverbs to process, an f0 statement is used in the score with a duration equal to the desired overall project duration.)
The example project also uses a Square instrument that only has a per-note audio signal block. This shows how an Instrument can route signals to the Mixer whether they have per-instrument signal blocks or not. Also, by comparing the two Instrument designs, we see that an expensive opcode like moogladder can be instantiated once in the SawBody instrument and used to process all of the notes from the Saw instrument, while a unique instance of lpf18 is used in every note instance of Square. The decision to use a separate per-instrument block for the Saw Instrument was chosen as the filter was to be used in a global way, while the filter in Square really needed to be used to shape the sound on each note. Looking at the designs of the two Instruments may help to understand more clearly when you may want to use a single Csound instrument or pair of instruments in your own work.
Routing Signals
To route signals between the per-note and per-instrument signal blocks of our Instrument, as well as to route signals from the Instruments to the Mixer instrument, the example project is using the Signal Flow Graph Opcodes. (For more information on these opcodes, please see Michael Gogins' article Using the Signal Flow Graph Opcodes found within the same issue of the Csound Journal as this article.) There are a number of other ways to route signals between instruments including global a-sigs, the zak family of opcodes, the Mixer opcodes, as well as using chnset and chnget. All of these methods work and can achieve the same end results, but the details of how they are used can make coding easier or more difficult depending on the context of your project. The Signal Flow Graph Opcodes were chosen for this example project for their ease of use and for using Strings to easily name and connect instrument signal ports. It is worth investigating the other methods to determine their strengths and weaknesses and evaluate what is best for your project.
Implementing a Mixer and Effects
To implement a Mixer and Effects, the example project uses a single Csound instrument to contain all of the code for taking in signals from Instruments, applying a fader, passing signals through Effects, and applying panning to the signal. The signals are first brought into the instrument using the inleta opcode. The signals from the Instruments are then optionally sent through Effects, implemented in the project using UDO's. Next, a fader is applied by multiplying a signal by a scaling factor and panning is performed using the pan2 opcode. Finally, the signals are mixed together using the sum opcode and output to file or soundcard using the outs opcode.
By using a single Csound instrument to hold all of the mixer code, we gain the advantage of handling all of that code in a single place. Also, by using UDO's for Effects instead of separate instruments per Effect as is shown in the manual example for the Signal Flow Graph Opcodes, we are able to use multiple instances of the samae Effect in the same project, inserting it wherever we like within the mixer's internal signal flow graph. For example, while we only have one instance of the FeedbackDelay UDO Effect in the example project within the mixer, we could easily add another instance of the effect elsewhere, say after the signal input from the Square Instrument. The final note about a single instrument for the Mixer is that it simplifies having to only write one usage of the alwayson opcode for everything within the Mixer.
Implementing Parameters Automation
The last feature of the basic MIDI-based studio to implement in our project is parameter automation. To achieve this, the example project uses the chnget and chnset opcodes to read and write values for our parameter. These opcodes were chosen as they allow using a String value to identify a parameter name–such as "fader1" and "pan1"–which is easy to read and to remember what they mean.
The project was originally developed with hardcoded values for parameters, then later modified to replace the hardcoded values with calls to chnget to allow those values to be automated. To set the parameter values, two special instruments were created: instr 1 which sets a parameter to a value and then immediately turn itself off, and instr 2, which takes in a start and end value for the parameter and linearly changes the parameter value over time. The two special instruments allow for setting values of parameters from the score in a generic way as the instruments take in a String name from the score for what parameter to modify. This design allows for the two instruments to be used to affect any parameter used in the entire project.
In the example project, parameters are exposed for automation in both the SawBody instrument as well as the Mixer instrument. While the project only has sawBodyCutoff, fader1, fader2, pan1, and pan2 as automatable, any value can be made to become automatable using chnget with this design. At the end of the CsScore section of the CSD, all of the notes dealing with the parameters are grouped together. The section starts of by initializing the start values of the parameters using notes for instr 1, followed by linear automation of parameters over time with notes for instr 2. Listening to the rendered output of the project should audibly demonstrate the changing of those parameters over time.
Note: At the time of this article, Csound has a design limitation for score notes to allow a maximum of one pfield that can be a String. Since we need to use a String for the parameter name to make this work, numbered instruments are used. When the design limitation can be addressed in Csound's codebase and more than one string can be allowed in a note, the special automation instruments may then be used as named instruments.
Conclusion
MIDI-based studio setups offer users the ability to work with well known tools of computer music: Instruments, Effects, Mixers, and parameter automation. Hopefully those who are familiar with these sets of tools can now find a way to take their experience and apply them to their Csound work. While the article has shown how to implement a basic form of these tools, there are certainly more advanced features from studios that can be implemented. The reader is encouraged to take the knowledge from this article and continue to explore and develop their Csound setups, building more complex parameter automation instruments (i.e. non-linear curves, randomized jitter, oscillating values, etc), implementing subchannels within their Mixers, as well exploring other signal routing techniques like sends and sidechaining. Hopefully with time the reader will feel comfortable being able to apply their knowledge and experience from MIDI-based studios to Csound as well discover all of the unique qualities of Csound to expand their musical horizons.