Introduction
This article continues a Java example first written about in "Csound Journal" Volume 1 Issue 4 - Summer 2006, called "The Ubiquitous Slider Demo" [1]. That example was for Csound5.02, and utilized the Eclipse IDE on a PC with a MinGW built Csound. Since that article, a few people have written to ask why it does notstill work? In this article I returned to the approach of passing data from a host to the software bus using the "chn" and "chnget" opcodes, but decided to write about how to create a small GUI frontend using Linux, and the NetBeans IDE.
I. Software Requirements
Software used: Fedora Core 6, NetBeans6.1, Java1.6.0_02, and a build of Csound5.08 to include the Swig generated Java wrappers. The files shown below are listed here, chnget.zip.
The NetBeans IDE has become popular for several reasons. One reason is the graphical designer feature which was called Matisse. In the example below I will use the graphical designer to create a simple container with buttons to communicate as host to the Csound software bus. This example is for simple instructive purposes only, and is not recommended or intended as an approach for developing a full-blown Java frontend.
If using Fedora, in order to use the latest NetBeans, you may also need to update Java. NetBeans6.1 uses at least Java5. On Fedora Core 6, the JVM is the GCJ (GNU Compiler for Java) instead of the Sun package. Upgrading Java is not an easy task on Fedora Core, since it requires building and installing Java yourself. Some of the best instructions for help doing this are located at:
This site tells how to install, and configure Sun's Java 6 for Fedora Core. Sun also recently added a Linux installer for the Java SE with JDK. I used it for Fedora 8, and also Fedora 9, and it seemed to solve many of the problems outlined in the above article.
Once you have Java upgraded to at least Java5 or better, then go to netbeans.org and download the NetBeans configuration of your choice. I used the "all" configuration which comes with Ruby as well as the GlassFish application server built on Java EE technology, and the Tomcat JSP container for Apache Server [2]. You can add and remove packs later using the IDE's Plugin Manager.
On Linux, the NetBeans installer has an .sh extension and can be made into an executable using chmod, or the shell script can simply be run from the command line starting the installer. Once the installer wizard begins, there are several options to choose for setting up the IDE, such as which JDK to use, where to install the GlassFish server, and user name and passwords for the default server domain etc. Everything seemed to run smoothly on Fedora Core 6, and installation was accomplished without any problems. I had a previous version of NetBeans and uninstalled everything before upgrading. After installation is complete, you should see the NetBeans icon under the programming option of the fedora applications menu.
In order to use Csound as a backend synthesis engine to a NetBeans GUI, the Csound API and the bus opcodes will be employed. This is just one approach. There are several frontend designs such as using pipes, employing Csound as an executable, client/server, writing your own API, or in this case using the Swig generated Java wrappers for the Csound API, and several other classes as well [3]. Java was never supported in Csound the way of other languages such as C/C++, Python, or TK/TCL, thus one consistent problem with a Java frontend built on the Csound API is that its use depends largely upon the automation of the Swig generated wrappers for Csound's C/C++ headers and class files. Since Csound's files change soon under development, it is very likely the frontend code employing a wrapped API call could also be broken [4].
To utilize the Java wrappers you will probably need to build Csound yourself on Linux. The source code is available via CVS on sourceforge.net. On Linux, if connected to the Internet, from the terminal type: cvs -d:pserver:anonymous@cvs.sourceforge.net:/cvsroot/csound login, then for cvs password: leave blank, and hit return or enter (see cvs [login aborted]: connect to [cvs.sourceforge.net]:2401 failed: No route to host). Then type, cvs -z3 -d:pserver:anonymous@csound.cvs.sourceforge.net:/cvsroot/csound co csound5, and the latest sources should be downloaded to your machine. It is outside the scope of this article to describe the full Csound build process, but for many of the dependency packages such as Swig, Alsa, Libsndfile, FLTK, etc. type su, then sudo yum install libsndfile-devel fltk-devel fltk-fluid scons, for example, to install some of the desired and necessary packages on your machine [5].
The two most important Csound source files for building Csound are Sconstruct and custom.py which include various options and paths to dependencies. Sconstruct is a kind of makefile which uses the Python build tool Scons (if your do not have it, you will also have to use yum to install it). Edit the options in Sconstruct to include 'buildJavaWrapper', also add the option to 'buildInterfaces', and in custom.py set the lib and include paths for Java, among other non-standard locations for the added and installed packages you may want to add.
On my machine, in custom.py, I use overkill and add both the Java bin and lib directories to the custom python path which is utilized in Sconstruct. Note these are the paths after I installed Sun's Java following the instructions from the link shown above.
customCPPPATH.append('/usr/java/jdk1.6.0_02/include')
customLIBPATH.append('/usr/java/jdk1.6.0_02/bin')
customCPPPATH.append('/usr/java/jdk1.6.0_02/include')
customLIBPATH.append('/usr/java/jdk1.6.0_02/lib')
The build process, if successful, creates a lib_jcsound.so, and places the various .java files in the interfaces folder of the source code. The long standing bug of needing the .java files in order to create the csnd.jar means you need to build twice in order to see the size on the csnd.jar file increase to a valid file size. If the file size for the csnd.jar is 0K or 1K, then there are no classes in the archive, and you need to run the build again. The csnd.jar should be created and viewable in the source code folder. However the individual .java files from the interfaces folder are handy, in addition to the csnd.jar, because you can inspect them to learn which C/C++ classes and methods become wrapped.
II.NetBeans Project
New Project
In NetBeans6.1 setup a new project. Select New Project. Java Application. For Project Name enter ChnGetApp. Deselect the Create Main class checkbox, and hit "finish". See a new project tree in the Project window showing the ChnGetApp, and under Source Packages see also a blank or empty default package. Expand the Libraries branch and you should see the JDK listed you selected as an install option. If you do not see the JDK listed, then right click on the project name, choose "properties", then select "Libraries", you should see an option to select a java Platform if installed on your machine. Alternatively you can select the Tools menu, Java Platforms, then Add Platform from the list of Java implementations on your machine.
Back in the project tree right click on the Libraries branch, and choose "Add JAR/Folder". Navigate to your csnd.jar file, and click O.K. Only use the csnd.jar compiled with your version of Csound, since the Csound source code and the wrappers do change. You should see the csnd.jar listed in the Libraries branch of the project tree. Expand the csnd.jar, then expand the csnd package to view the individual class files. These are the compiled, binary, archived .java files from the Csound interfaces folder. By highlighting a class, you should be able to view the class methods and parameters, noting what kind of arguments belong in the various method signatures by scrolling in the Navigator window, located below the Project view.
As an alternative method to employing csnd.jar, you can make your own archive of the .java files, for example by creating a .zip file, naming it csnd.zip, then choosing "Add JAR/Folder" and adding your .zip to the Libraries branch instead of the csnd.jar. Because the .java files have not been compiled, you can open and inspect them in the source code viewer. In either case, you still need to use the "import csnd.*;" statement in your .java files, the sample code for which is shown below.
StartUp.java class
Select the Source Packages branch again, and right click on the empty, default package, and choose New, Java Package. Name the package chnget, and hit "finish". Then right click on the newly named chnget package, choose New, and select Java Class. For Class Name enter StartUp, and hit "finish". Expand the chnget package to view the StartUp.java file. In the source code viewer you should see a generic class template with rudimentary code setup. You can adapt the template code or delete it and add the following code to the auto created template by copying/pasting. The StartUp class has a Main Method in it, initializes the container, and calls a new instance of MyJPanel, a class which will be created below for GUI elements. Save the StartUp.java file. It should have several errors listed since there are two more classes which need to be added to the project later.
package chnget;

import javax.swing.*;
import java.awt.Color;
import java.awt.Container;
import java.awt.event.WindowAdapter;
import java.awt.event.WindowEvent;

public class StartUp extends JFrame{
    MyJPanel myjpanel;
    // ****the Container****
    static Container contentPane;

    /** Creates a new instance of StartUp */
    public StartUp() {
        super("changet");
        initGUI();
    }

    public void initGUI(){
        myjpanel = new MyJPanel();
        contentPane = getContentPane();
        contentPane.setLayout(new BoxLayout(contentPane, BoxLayout.Y_AXIS));
        contentPane.setBackground(Color.LIGHT_GRAY);

        try {
            contentPane.add(myjpanel);
        } catch (Exception e) {
        }
    }

    public static void main(String[] args) {
        try {
            UIManager.setLookAndFeel(UIManager.getSystemLookAndFeelClassName());
        } catch (Exception e) {
        }

        StartUp app = new StartUp();
        app.addWindowListener(new WindowAdapter() {
            public void windowClosing(WindowEvent e) {
                System.exit(0);
            }
        });

        app.pack();
        app.setVisible(true);

    } //ends main

} //ends outer class StartUp
changet_thread.java class
Right click on the chnget package, choose New, and select Java Class. For Class Name enter changet_thread, and hit "finish". In the source code viewer you should see a generic class template with rudimentary code setup. You can adapt the template code or delete it and add the following code.
This class implements several wrapped Csound methods and functions in a separate thread. Notice the "import csnd.*" statement which employs the csnd.jar file. Note in the args.Append statement below, you will also need to change the path to your ChnGetTest.csd which will be explained below. You may also need to adjust args.Append statements depending upon your sound card drivers and I/O hardware. For example on Fedora Core, I use the madfu M-Audio driver using ALSA for rtaudio. On the command line, using the -o flag, this is normally listed as -odac:hw:0,1, but in the Java code shown below devaudio seems to work fine for realtime audio on my machine.
package chnget;

import csnd.*;

public class changet_thread extends Thread {
    SWIGTYPE_p_void myvoid;
    SWIGTYPE_p_CSOUND_ mycsound = csnd.csoundCreate(myvoid);
    Csound csound = new Csound();
    CsoundArgVList args = new CsoundArgVList();
    CsoundMYFLTArray myfltarray = new CsoundMYFLTArray();

    boolean on = false;
    boolean pause = false;

    double myvalue;

    changet_thread(double someValue) {
        myvalue = someValue;
        run();
    } //ends constructor

    public void run() {
        args.Append("csound");
        args.Append("-s");
        args.Append("-d");
        args.Append("-odevaudio");
        args.Append("-b4096");
        args.Append("-B4096");
        args.Append("-+rtaudio=ALSA");

        String csd = "/home/JCH/ChnGetTest.csd";

        args.Append(csd);

        try {
             int result = csound.Compile(args.argc(), args.argv());
             int myinputch = csndConstants.CSOUND_INPUT_CHANNEL;
             int mycontch = csndConstants.CSOUND_CONTROL_CHANNEL;

             SWIGTYPE_p_p_float myptr = myfltarray.GetPtr();

             if (result == 0) {
                while (csound.PerformKsmps() == 0) {
                    if (csnd.csoundGetChannelPtr(mycsound, myptr,
                        "pitch", myinputch | mycontch) == 0)
                    {
                        csound.SetChannel("pitch" , myvalue);
                    }
                }

            }
        } catch (Exception e) {
        }

        //java.lang.System.err.println("Could not Perform...\n");
        //csound.Stop();
        //csound.Cleanup();
        csound.Reset();
        java.lang.System.exit(1);
    } //end run method

}//ends changet_Thread
MyJPanel.java class
Now you need to create the small graphical frontend, which is a new Jpanel Form. Right click on the chnget package, choose New, and select JPanel Form. For Class Name enter MyJPanel, and hit "finish". In the source code viewer you should see a generic class template with rudimentary code setup, and also there is a new MyJPanel.form file placed in the src folder of the ChnGetApp which is not shown in the project window. You can switch back and forth between Design view, the graphical view, and the Source or code view. The GUI designer, called Matisse, is one of the more popular features of the NetBeans IDE. The Design window should show a new basic design onto which you can drag and drop components from a palette using Swing and AWT widgets. Also the properties window will show the values, such as labels, texts, etc. for the particular widget you are going to employ.
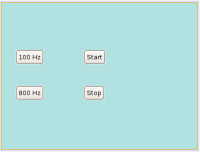
Select the JPanel container by clicking on the GUI. In the properties list, find the Background property and open the Custom Editor by clicking the button next to the Background property selections. Select a background color for the widget. The GUI should change color, and you can also Preview the design by selecting the Preview button on the Designer Toolbar. Next select and drag a Swing button component to the JPanel Form. While it is still selected scroll down the properties list for the widget until you see Text, and type in 100Hz. The button label should now show 100Hz. Add another Swing button and for Text type in 800Hz. Add two more buttons and label them Start and Stop. The simple frontend GUI should look something like the image below.
package changet;

public class MyJPanel extends javax.swing.JPanel {

    /** Creates new form MyJPanel */

    public MyJPanel() {
        initComponents();
    }

    private void initComponents() {
        jButton1 = new javax.swing.JButton();
        jButton2 = new javax.swing.JButton();
        jButton3 = new javax.swing.JButton();
        jButton4 = new javax.swing.JButton();

        setBackground(new java.awt.Color(178, 225, 225));

        jButton1.setText("100 Hz");
        jButton2.setText("800 Hz");
        jButton3.setText("Start");
        jButton4.setText("Stop");

        javax.swing.GroupLayout layout = new javax.swing.GroupLayout(this);
        this.setLayout(layout);

        layout.setHorizontalGroup(
            layout.createParallelGroup(javax.swing.GroupLayout.Alignment.LEADING)
                .addGroup(layout.createSequentialGroup()
                .addGap(29, 29, 29)
                .addGroup(layout.createParallelGroup(
                    javax.swing.GroupLayout.Alignment.LEADING)
                .addComponent(jButton1)
                .addComponent(jButton2))
                .addGap(82, 82, 82)
                .addGroup(layout.createParallelGroup(
                    javax.swing.GroupLayout.Alignment.LEADING)
                .addComponent(jButton4)
                .addComponent(jButton3))
                .addContainerGap(188, Short.MAX_VALUE))
                );

        layout.setVerticalGroup(
            layout.createParallelGroup(javax.swing.GroupLayout.Alignment.LEADING)
                .addGroup(layout.createSequentialGroup()
                .addGap(97, 97, 97)
                .addGroup(layout.createParallelGroup(
                    javax.swing.GroupLayout.Alignment.BASELINE)
                .addComponent(jButton1)
                .addComponent(jButton3))
                .addGap(44, 44, 44)
                .addGroup(layout.createParallelGroup(
                    javax.swing.GroupLayout.Alignment.BASELINE)
                .addComponent(jButton2)
                .addComponent(jButton4))
                .addContainerGap(101, Short.MAX_VALUE))
                );
    }

    private javax.swing.JButton jButton1;
    private javax.swing.JButton jButton2;
    private javax.swing.JButton jButton3;
    private javax.swing.JButton jButton4;

}
Example 4. MyJPanel.java, Autogenerated Code
Switch to Source and you should see the code generated above for the simple cyan colored GUI with four buttons. To this generated code we will add our own Action Listeners. To the existing MyJPanel.java file add two import statements, import java.awt.event.ActionEvent, and import java.awt.event.ActionListener. Since some of the Java code is generated from the GUI components you added to the Designer, NetBeans will allow you create additional code thru the properties menu of each widget. For adding action listeners to the jButtons, after selecting a GUI button in the designer I selected the Code menu and added the listeners in the Post-Listeners property for each button. Clicking the ellipsis brings up a code window to which you can add "jButton1.addActionListener(new Button1_ActionListener());", for example, which will insert the action listener into the auto generated code. Also add the Action Listener methods as shown below at the bottom of the code example. You can add those by hand beneath the auto generated section code. Finally add the variable double adoubleValue to the list of variables. Save the modified MyJPanel.java file. The modified file should now look like the code shown below.
package chnget;

import java.awt.event.ActionEvent;
import java.awt.event.ActionListener;

public class MyJPanel extends javax.swing.JPanel {

    public MyJPanel() {
        initComponents();
    }

    private void initComponents() {
        jButton1 = new javax.swing.JButton();
        jButton2 = new javax.swing.JButton();
        jButton3 = new javax.swing.JButton();
        jButton4 = new javax.swing.JButton();

        setBackground(new java.awt.Color(178, 225, 225));

        jButton1.setText("100 Hz");
        jButton1.addActionListener(
            new Button1_ActionListener());

        jButton2.setText("800 Hz");
        jButton2.addActionListener(
            new Button2_ActionListener());

        jButton3.setText("Start");
        jButton3.addActionListener(
            new Button3_ActionListener());

        jButton4.setText("Stop");
        jButton4.addActionListener(
            new Button4_ActionListener());

        javax.swing.GroupLayout layout = new javax.swing.GroupLayout(this);
        this.setLayout(layout);

        layout.setHorizontalGroup(
            layout.createParallelGroup(
                javax.swing.GroupLayout.Alignment.LEADING)
            .addGroup(layout.createSequentialGroup()
            .addGap(29, 29, 29)
            .addGroup(layout.createParallelGroup(
                javax.swing.GroupLayout.Alignment.LEADING)
            .addComponent(jButton1)
            .addComponent(jButton2))
            .addGap(82, 82, 82)
            .addGroup(layout.createParallelGroup(
                javax.swing.GroupLayout.Alignment.LEADING)
            .addComponent(jButton4)
            .addComponent(jButton3))
            .addContainerGap(188, Short.MAX_VALUE))
        );

        layout.setVerticalGroup(
            layout.createParallelGroup(
                javax.swing.GroupLayout.Alignment.LEADING)
            .addGroup(layout.createSequentialGroup()
            .addGap(97, 97, 97)
            .addGroup(layout.createParallelGroup(
                javax.swing.GroupLayout.Alignment.BASELINE)
            .addComponent(jButton1)
            .addComponent(jButton3))
            .addGap(44, 44, 44)
            .addGroup(layout.createParallelGroup(
                javax.swing.GroupLayout.Alignment.BASELINE)
            .addComponent(jButton2)
            .addComponent(jButton4))
            .addContainerGap(101, Short.MAX_VALUE))
        );
    }

    // ******************************************************
    // ******************************************************
    // ACTION LISTENERS for the FILE Menu selections
    // ******************************************************
    // ******************************************************

    private class Button1_ActionListener implements ActionListener
    {
        public void actionPerformed(ActionEvent e)
        {
            adoubleValue = 100.00;
        } //ends inner class

    } //ends StartActionListener

    // ******************************************************

    private class Button2_ActionListener implements ActionListener
    {
        public void actionPerformed(ActionEvent e)
        {
            adoubleValue = 880.00;
        } //ends inner class

    } //ends StartActionListener

    // ******************************************************

    private class Button3_ActionListener implements ActionListener
    {
        public void actionPerformed(ActionEvent e)
        {
            changet_thread c = new changet_thread(adoubleValue);
        } //ends inner class
    } //ends StartActionListener

    // ******************************************************

    private class Button4_ActionListener implements ActionListener
    {
        public void actionPerformed(ActionEvent e)
        {
            java.lang.System.exit(0);
        } //ends inner class
    } //ends StartActionListener

    private javax.swing.JButton jButton1;
    private javax.swing.JButton jButton2;
    private javax.swing.JButton jButton3;
    private javax.swing.JButton jButton4;
    double adoubleValue;

}
Example 5. MyJPanel.java, with Added Action Listeners Code
ChnGetTest.csd
The " ChnGetTest.csd" listed in args.Append of the chnget_thread.java code, is a simple .csd to test the Csound bus opcodes "chn", and "chnget". I have had problems compiling from NetBeans if the .csd file is nested too deep in the filing structure. Therefore I place the .csd near the top level of my home directory (ex. /home/JCH/ChnGetTest.csd).
<CsoundSynthesizer>

<CsOptions>
</CsOptions>

<CsInstruments>
sr = 44100
kr = 4410
ksmps = 10
nchnls = 1

chn_k "pitch", 1

gifn ftgen 1,0, 16384, 10, 1, .5, .33, .25, .2, \
           .16, .14, .12, .1, .9, .8, .7, .6, .5
gifn ftgen 2, 0, 16384, 10, 1

instr 1

k1 chnget "pitch"
printk2 k1

asig oscili 5000,k1, 1

out asig

endin

</CsInstruments>

<CsScore>
i1 0 5
</CsScore>

</CsoundSynthesizer>
Example 6. ChnGetTest.csd
Possible Errors
Now try to build and run the application. At this point, however, several problems may exist which need to be solved. One issue with the newly installed Sun Java on Fedora is that the java.library.path may not point to your build of Csound which includes the lib_jcsound.so. The error is shown below.
_jcsound native code library failed to load.
java.lang.UnsatisfiedLinkError: no _jcsound in java.library.path
Java Result: 1
In Netbeans 6.1 the Java -D option is placed in the VM Options space located by right clicking the project, then selecting properties and choosing the Run options. Add the following to the VM Options, noting differences to the path with your build of Csound.
"-Djava.library.path=/home/JCH/csound508_java"
Also I have found, on Linux, the Csound environment variable OPCODEDIR generally is required for Csound to compile effectively when accessed from a frontend.
NetBeans has the VM Options for using the -D java flag, but you will need to set your environment variables the standard way for your Unix machine [6].On Fedora Core 6, using bash, I employed Vi to edit the .bash_profile in the HOME directory to include OPCODEDIR=/home/JCH/csound508_java; export OPCODEDIR.
Another typical problem is one associated with sound cards, audio drivers, and various buffer and latency settings. Since you probably know your system best, then you should be able to adjust as needed. One thing I do for trouble shooting is run Csound from the command line, setting all required flags on the command line, not in the .csd options tag, until I solve the realtime audio issues. Then when communicating from Java to Csound thru the API, such as using the CsoundArgVList wrapper, you understand better what might be going wrong with the audio flags and drivers [7].
If everything builds successfully, then run the application, and you should see a message something like below:
To run this application from the command line without Ant, try:
java -jar "/home/JCH/NetBeansProjects/JavaCsound/dist/JavaCsound.jar"
There is a default option to create a distribution .jar of the application when compiled in NetBeans, allowing you to run the app from the command line, not from within NetBeans each time.
III. Conclusion
The development of a small Java frontend GUI example for passing data from the host to the software bus using the "chn" and "chnget" opcodes is for instructive purposes only, and is not recommended or intended as an approach for developing a full-blown Java frontend. Java is a powerful programming language and has many new features, classes, and libraries, as well as its own sound engine, JavaSound. Java has not been supported in Csound as well as other languages such as C/C++, Python, and Tk/Tcl. Any frontend which relys on the Csound API will be required to upgrade soon reflecting also changes in Csound. Therefore it probably makes more sense to develop a frontend using C/C++ which is the language of Csound. However additional issues such as graphics, utilizing widgets, design features and functions, and additional packages such as XML, are considerations when choosing a programming language, and IDE for development if planning on developing small frontend GUI applications.
Notes:
[1] The code included in "The Ubiquitous Slider Demo" article from "Csound Journal" Volume 1 Issue 4 - Summer 2006, worked in Csound5.02, but became broken by Csound5.04. Here is an updated version of the demo which was working as of Csound5.08. sliderdemo.zip.
An additional step not mentioned above is the use of a shell script to start Scons for the build process. Steven Yi helped me with this a few years ago, and it works great. I place the following script, which reconfirms the build options, in a file named something like MyBuild.sh, and from the command >$ bash MyBuild.sh in order to start Scons. (Note: The lines below after the "#!/bin/sh" should be one single line of code)
#!/bin/sh

/usr/bin/python2.4 /usr/bin/scons-0.97 buildInterfaces=1 useOsc=1
buildPythonOpcodes=0 buildLoris=0 buildStkOpcodes=0 gcc3opt=0 gcc4opt=0
noDebug=0 buildPDClass=0 useDouble=0 dynamicCsoundLibrary=0 usePortAudio=0
useALSA=1 useJack=0 useFLTK=1 noFLTKThreads=0 pythonVersion=2.4 buildCsoundVST=0
generateTags=0 generatePdf=0 generateXmg=0 generateZip=0 usePortMIDI=0
useLrint=0 useGprof=0 word64=0 install=0 useDirentFix=0 buildPDclass=0
useCoreAudio=0 useAltivec=0 MSVC=0 buildDSSI=0 buildutilities=1
buildJavaWrapper=1 buildNewParser=0 buildvst4cs=0 buildSDFT=1 $1 $2 $3 $4
WARNING: could not open library '/home/JCH/csound508_java/_csnd.so'
(libcsnd.so.5.1: cannot open shared object file:
No such file or directory).java -jar
"/home/JCH/NetBeansProjects/JavaCsound/dist/JavaCsound.jar"
At this point the project has compiled, is running, and the MyJPanel form GUI is showing. After hitting the start button on the GUI you might see this error or warning.While it's complaining about the location of the _csnd.so lib, it really has to do with the fact that it's having trouble locating the .csd file. As mentioned above the solution was to move the .csd near the top level of my home directory (ex. /home/JCH/ChnGetTest.csd).